Overview ℹ️
Actions are the tasks executed when the criteria are satisfied. Each action can be delayed, allowing it to be executed at a specific time. Available Actions:- Send Message - Send a message to a chat or group.
- Reply to message - Reply to a message.
- Forward Message - Forward a message to another chat.
- Update Flag Status - Flag a message in Periskope.
- Delete a message - Delete a message from a chat.
- Notify HTTP - Send a notification/hook to an external HTTP endpoint.
- Create Ticket - Create a new ticket in Periskope.
- Assign Ticket - Assign a ticket to a user.
- Close Ticket - Close a ticket in Periskope.
- Add Ticket Label - Add one or more labels to a ticket.
- Add Chat Label - Add a label to a chat.
- Assign Chat - Assign a chat to a user.
- Update a Chat Custom Property - Update a custom property of a chat.
- Send an email - Send an email to a user.
- Set Ticket Due Date - Set a due date for a ticket.
- Update Ticket Custom Property - Update a custom property of a ticket.
- Attach Message To Latest Ticket - Attach a message to the latest ticket based on statuses.
- Close Chat - Close a chat conversation.
- Send Message To Chat - Send a message to a specified chat.
- Send Slack Webhook Notification - Send a slack webhook notification to a channel.
- Create Ticket On Freshdesk - Create a ticket on Freshdesk (requires Freshdesk integration).
- Create Ticket On Hubspot - Create a ticket on Hubspot (requires Hubspot integration).
- Create Ticket On Zohodesk - Create a ticket on Zohodesk (requires Zohodesk integration).
The available actions may vary based on the triggers selected. Not all actions are available for all triggers.You can add multiple actions to a rule and set delays for each action.
1. Send Message Action 📩
The Send Message action allows you to send a message to a chat or group. You can customize the message content and choose the chat or group to send the message to.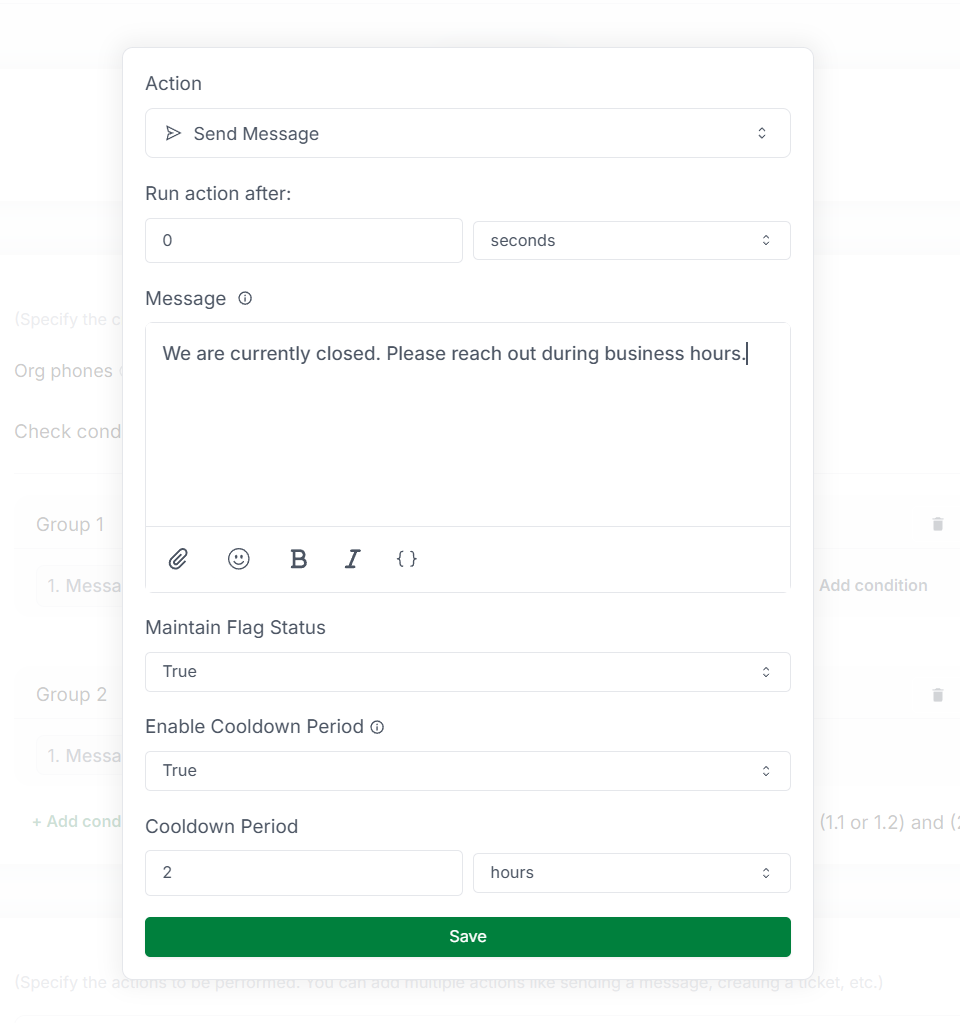
The delay before executing the action. You can specify the delay in seconds,
minutes, hours, or days.
The message content to be sent. You can add variables to personalize the message.Example:
Hello {{ chat.chat_name || '<fallback>' }}, your request has been received.Optional media file to attach to the message. You can upload an image, video, document, or other supported file type.
Option to maintain the flag status of the previous messages after sending the
reply.
Whether to enable a cooldown period after sending the message. You can set a
cooldown period to prevent sending multiple messages in quick succession.
The duration of the cooldown period. You can specify the period in seconds,
minutes, hours, or days.
2. Reply to Message Action 📩
The Reply to Message action allows you to reply to a message. You can customize the reply content and choose the message to reply to.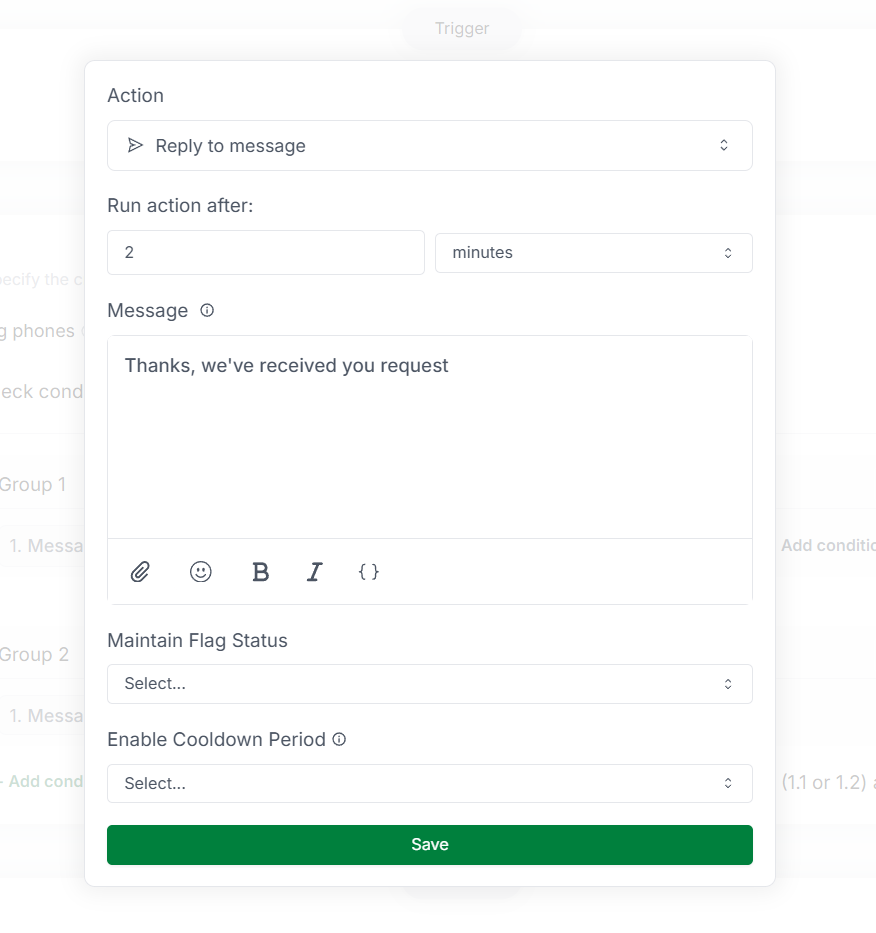
The delay before executing the action. You can specify the delay in seconds,
minutes, hours, or days.
The reply content to be sent. You can add variables to personalize the reply.Example:
Hello {{ message.sender_name || '<fallback>' }}, your request has been received.Optional media file to attach to the reply. You can upload an image, video, document, or other supported file type.
Option to maintain the flag status of the previous messages after sending the
reply.
Whether to enable a cooldown period after sending the reply. You can set a
cooldown period to prevent sending multiple replies in quick succession.
The duration of the cooldown period. You can specify the period in seconds,
minutes, hours, or days.
3. Forward Message Action 📩⏩
The Forward Message action allows you to forward a message to another chat.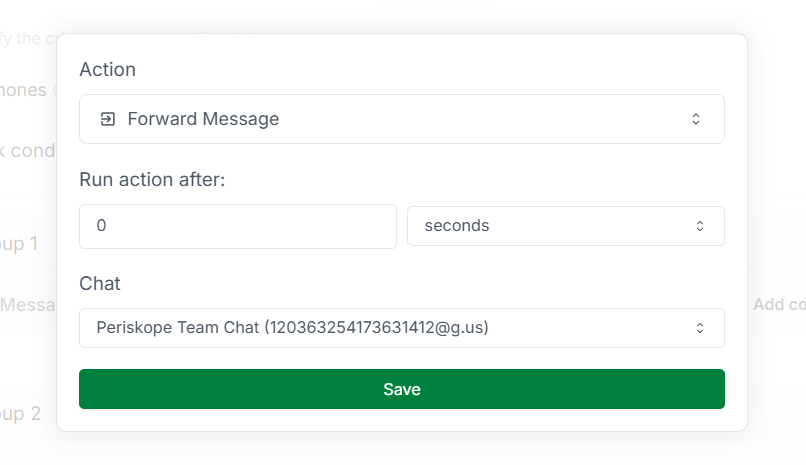
The delay before executing the action. You can specify the delay in seconds,
minutes, hours, or days.
The chat or group to forward the message to.
4. Update Flag Status Action 🚩
The Update Flag Status action allows you to flag or unflag a message in Periskope.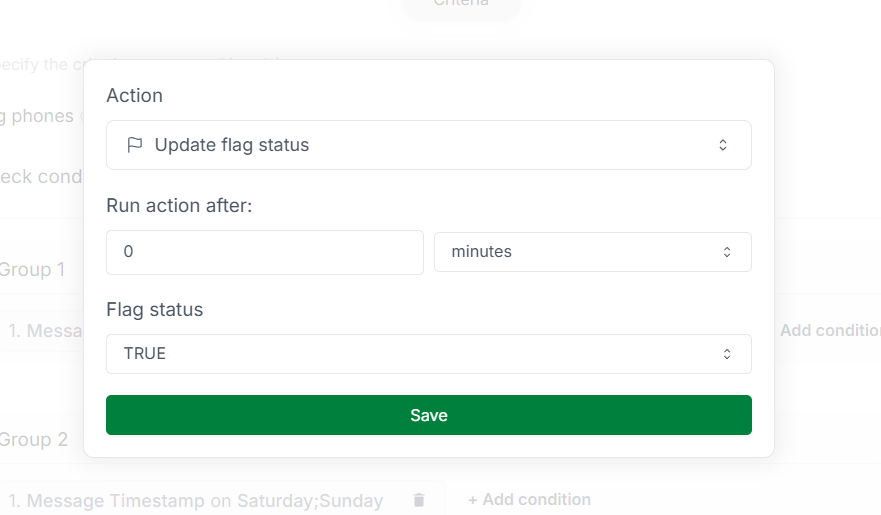
The delay before executing the action. You can specify the delay in seconds,
minutes, hours, or days.
The flag status to set for the message. You can choose to flag or unflag the
message.
5. Delete Message Action 🗑️
The Delete Message action allows you to delete a message from a chat.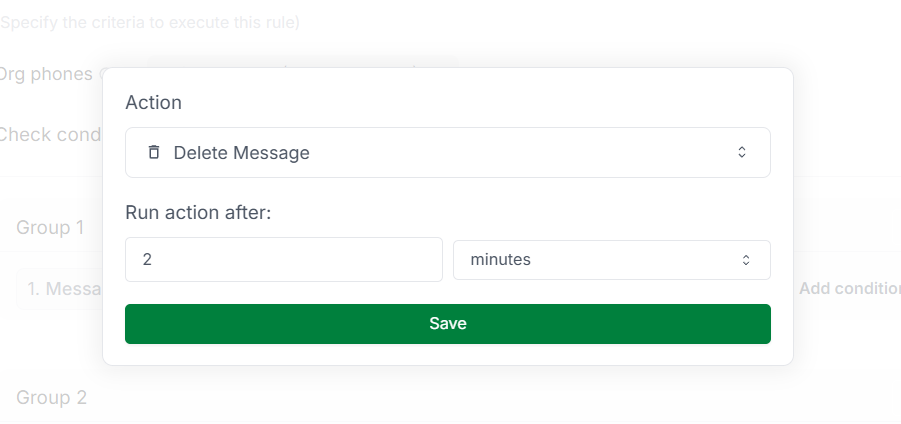
The delay before executing the action. You can specify the delay in seconds,
minutes, hours, or days.
6. Notify HTTP Action 🌐
The Notify HTTP action allows you to send a notification/hook to an external HTTP endpoint.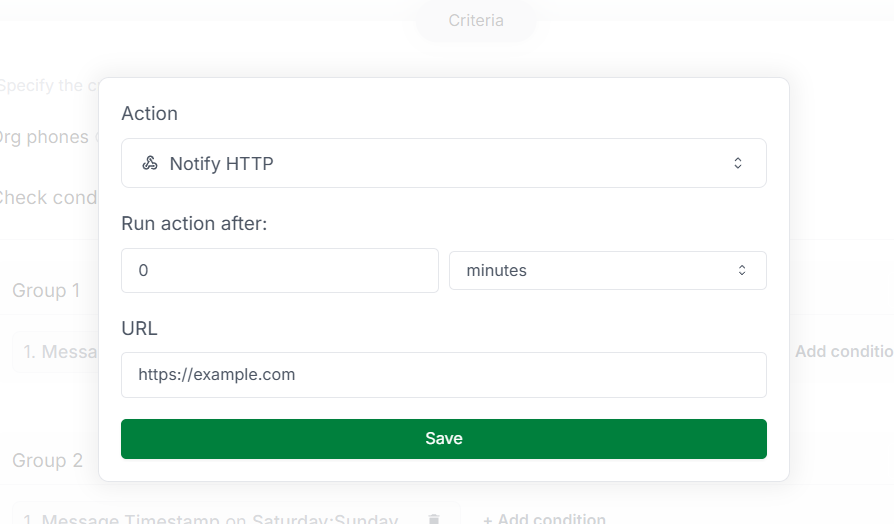
The delay before executing the action. You can specify the delay in seconds,
minutes, hours, or days.
The
POST / URL of the external HTTP endpoint to send the notification to.7. Create Ticket Action 🎫
The Create Ticket action allows you to create a new ticket in Periskope.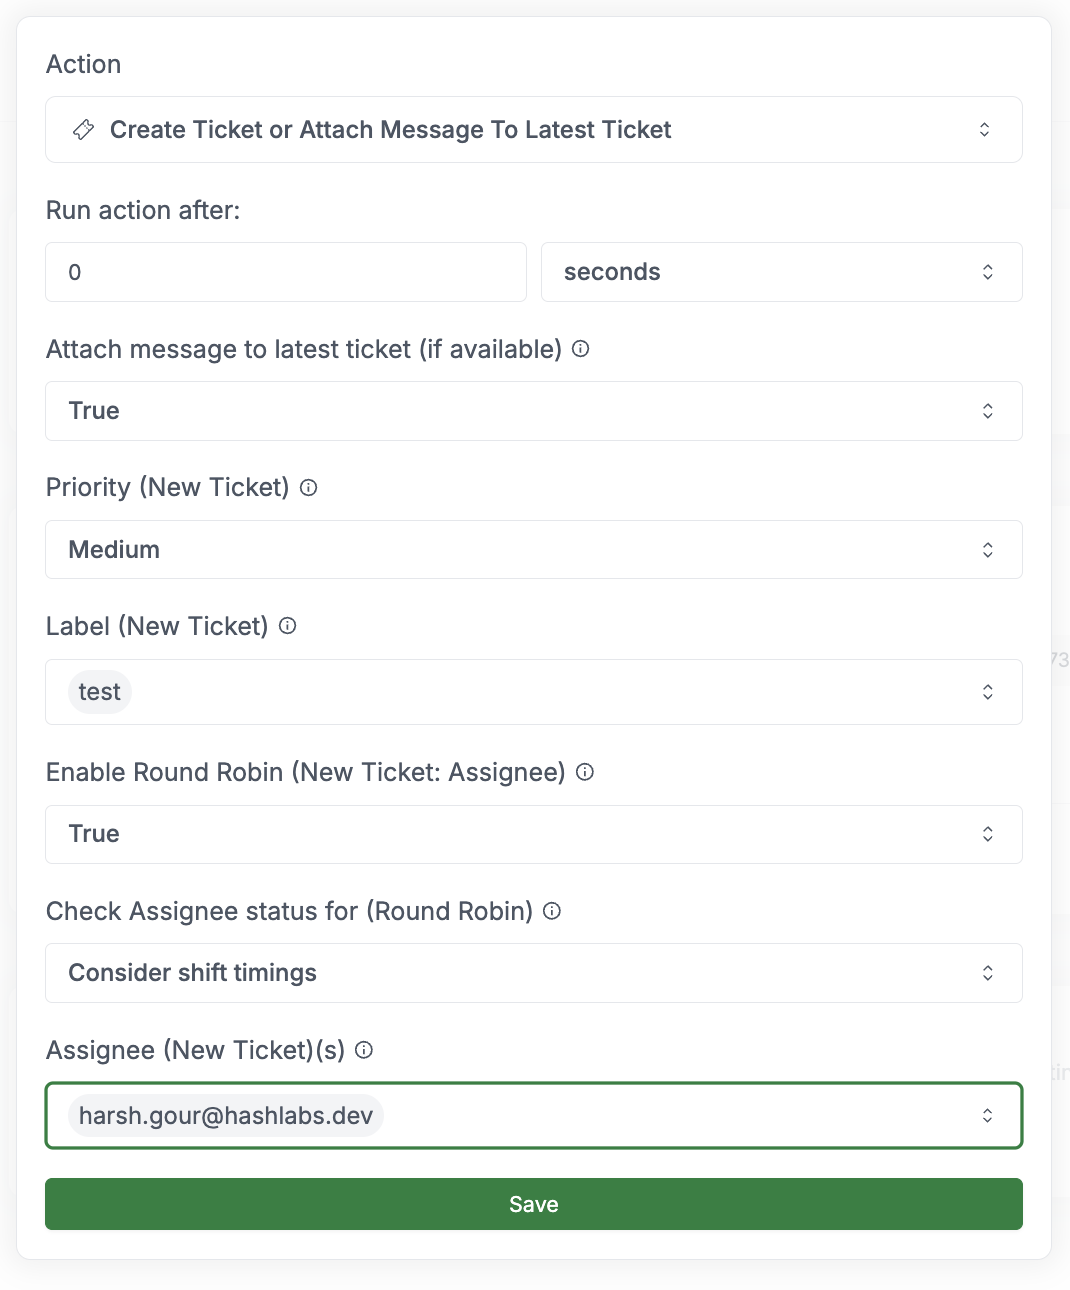
The delay before executing the action. You can specify the delay in seconds,
minutes, hours, or days.
If enabled, the message will be appended to the latest open ticket (if available) else a new ticket will be created.
The user to assign the ticket to.
Whether to assign the ticket using the round-robin method. You can enable
round-robin assignment to distribute tickets evenly among users.
This option is displayed when Round Robin is enabled. It determines how agent availability is considered when creating and assigning tickets:
- Consider shift timings: Only assigns tickets to agents who are within their configured work schedule
- Exclude users manually marked as offline: Only assigns tickets to agents who are not manually set to “offline”
- Exclude users marked as offline or away: Only assigns tickets to agents who are not marked as offline or away
- Consider both shift timings and user status: Only assigns tickets when both conditions are met (agent is within shift AND not manually marked offline)
The priority level of the ticket. You can choose from No Priority, Low, Medium, High, or
Urgent. Only applicable when creating a new ticket.
The labels to add to the ticket. You can add multiple labels by selecting from
the dropdown. Only applicable when creating a new ticket.
8. Assign Ticket Action 🎫👤
The Assign Ticket action allows you to assign a ticket to a user.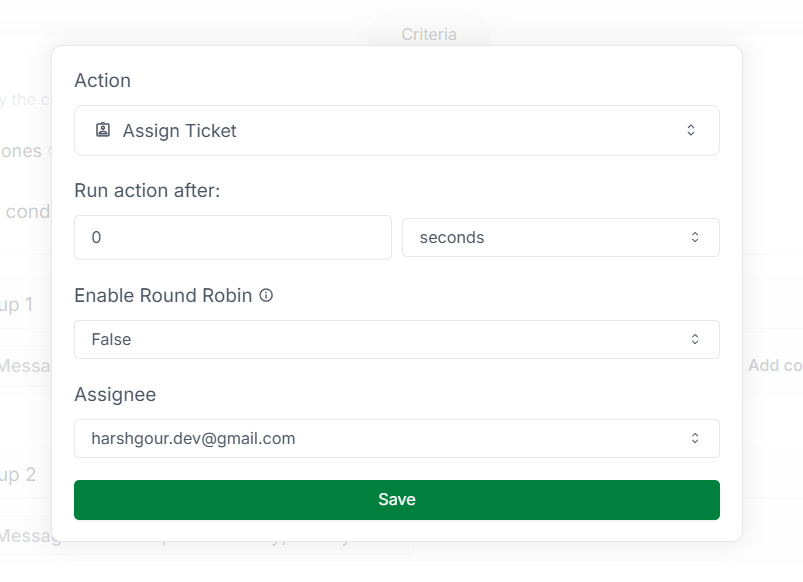
The delay before executing the action. You can specify the delay in seconds,
minutes, hours, or days.
Whether to assign the ticket using the round-robin method. You can enable
round-robin assignment to distribute tickets evenly among users.
Round-robin assignment assigns tickets to users in a circular order. Each user
receives a ticket in turn, ensuring an even distribution of tickets among
users.
This option is displayed when Round Robin is enabled. It determines how agent availability is considered when assigning tickets:
- Consider shift timings: Only assigns tickets to agents who are within their configured work schedule
- Exclude users manually marked as offline: Only assigns tickets to agents who are not manually set to “offline”
- Exclude users marked as offline or away: Only assigns tickets to agents who are not marked as offline or away
- Consider both shift timings and user status: Only assigns tickets when both conditions are met (agent is within shift AND not manually marked offline)
The user to assign the ticket to. If round-robin assignment is enabled, you can
select multiple users to assign tickets to.
9. Close Ticket Action 🎫❌
The Close Ticket action allows you to close a ticket in Periskope.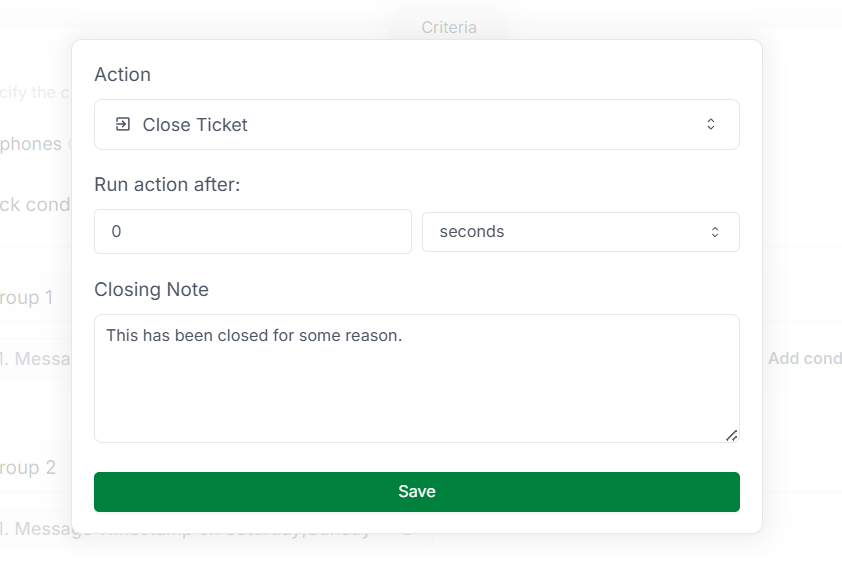
The delay before executing the action. You can specify the delay in seconds,
minutes, hours, or days.
The note to add when closing the ticket.Example:
Ticket has been resolved.10. Add Ticket Label Action 🏷️
The Add Ticket Label action allows you to add one or multiple label to a ticket.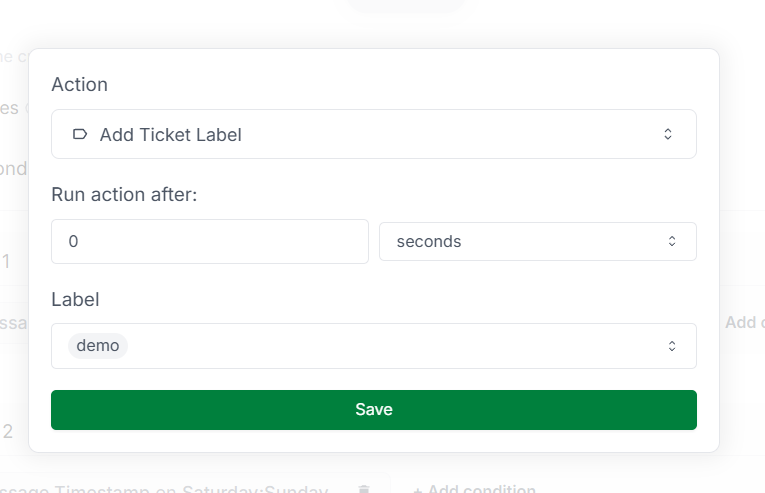
The delay before executing the action. You can specify the delay in seconds,
minutes, hours, or days.
The labels to add to the ticket. You can add multiple labels by selecting from
the dropdown.
11. Add Chat Label Action 🏷️
The Add Chat Label action allows you to add a label to a chat.
The delay before executing the action. You can specify the delay in seconds,
minutes, hours, or days.
The labels to add to the chat. You can add multiple labels by selecting from
the dropdown.
12. Assign Chat Action 💬👤
The Assign Chat action allows you to assign a chat to a user.
The delay before executing the action. You can specify the delay in seconds,
minutes, hours, or days.
Whether to assign the chat using the round-robin method. You can enable
round-robin assignment to distribute chats evenly among users.
Round-robin assignment assigns chats to users in a circular order. Each user
receives a chat in turn, ensuring an even distribution of chats among users.
This option is displayed when Round Robin is enabled. It determines how agent availability is considered when assigning chats:
- Consider shift timings: Only assigns chats to agents who are within their configured work schedule
- Exclude users manually marked as offline: Only assigns chats to agents who are not manually set to “offline”
- Exclude users marked as offline or away: Only assigns chats to agents who are not marked as offline or away
- Consider both shift timings and user status: Only assigns chats when both conditions are met (agent is within shift AND not manually marked offline)
The user to assign the chat to. If round-robin assignment is enabled, you can
select multiple users to assign chats to.
13. Update Chat Custom Property Action 📃
The Update Chat Custom Property action allows you to update a custom property of a chat.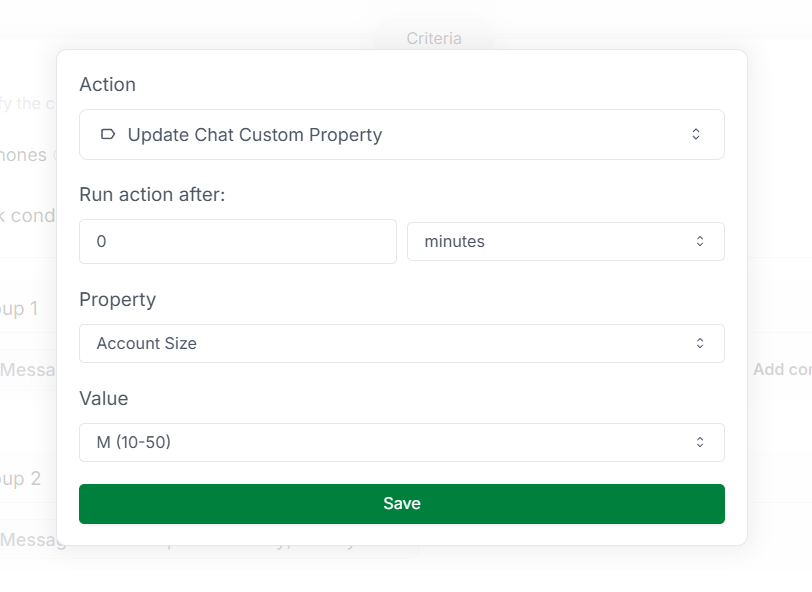
The delay before executing the action. You can specify the delay in seconds,
minutes, hours, or days.
The custom property to update. You can choose from the available custom
properties.
The new value to set for the custom property.If the custom property is of type
dropdown, you can select the option from the dropdown.
If the custom property is of type text, you can enter the text value.
If the custom property is of type date, you can select the date value from the calendar.14. Send Email Action 📧
The Send Email action allows you to send an email notification to any email address.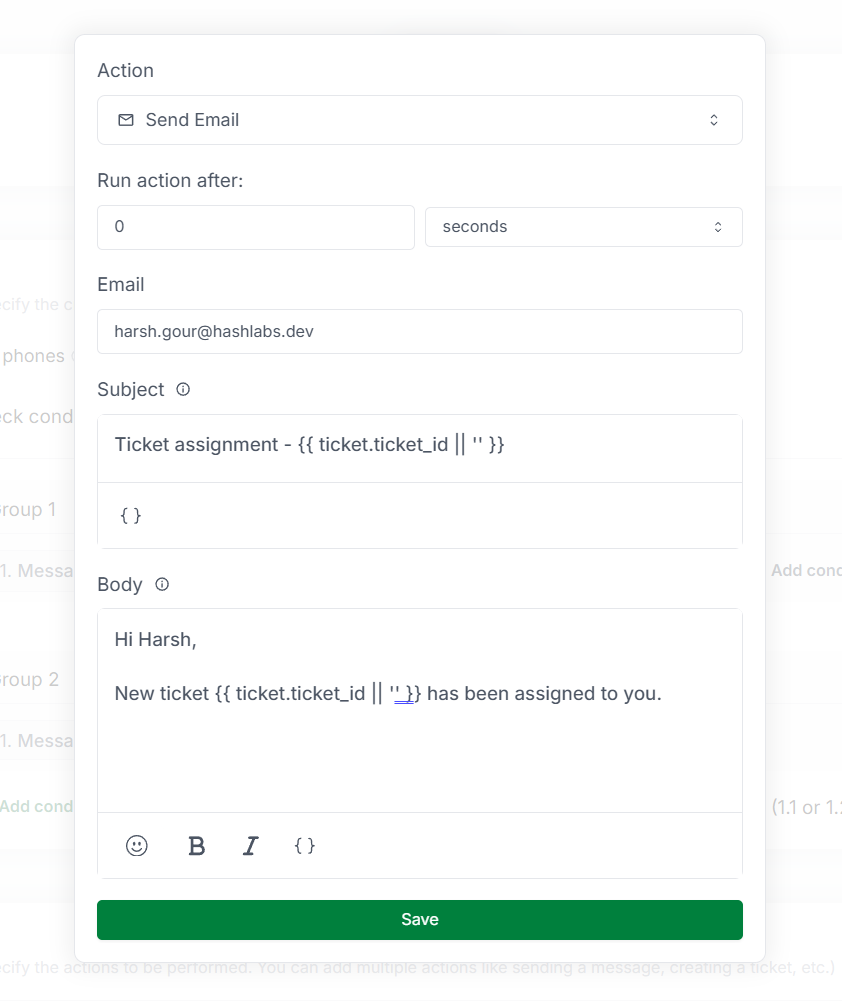
The delay before executing the action. You can specify the delay in seconds,
minutes, hours, or days.
The email address to send the email to.
The subject of the email. You can add variables to personalize the subject.Example:
New ticket created: {{ ticket.ticket_id || '<fallback>' }}The email content to be sent. You can add variables to personalize the email.Example:
Hello, new ticket {{ ticket.ticket_id || '<fallback>' }} has been assigned to you.15. Set Ticket Due Date Action 📅
The Set Ticket Due Date action allows you to set a due date for a ticket. The due date will be set after the specified time from the current date and time of rule execution.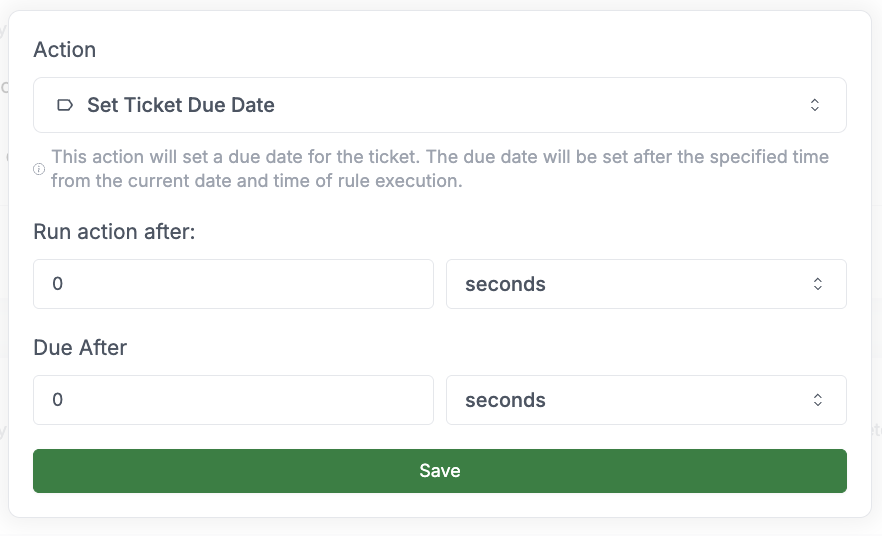
The delay before executing the action. You can specify the delay in seconds,
minutes, hours, or days.
The time duration after which the ticket will be due. You can specify the duration in seconds,
minutes, hours, or days from the current date and time of rule execution.
16. Update Ticket Custom Property Action 📃
The Update Ticket Custom Property action allows you to update a custom property of a ticket.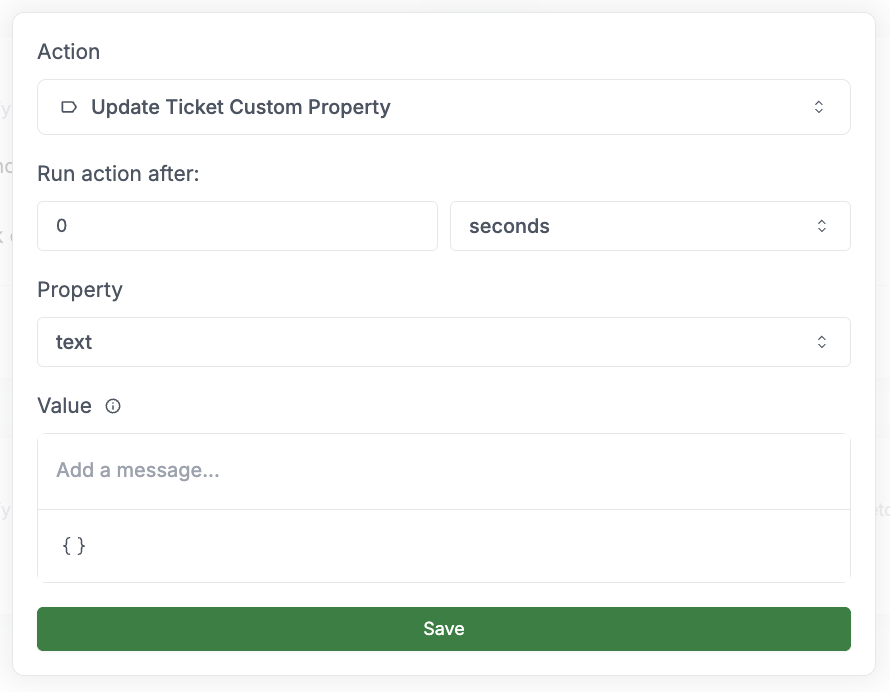
The delay before executing the action. You can specify the delay in seconds,
minutes, hours, or days.
The custom property to update. You can choose from the available ticket custom
properties.
The new value to set for the custom property.If the custom property is of type
dropdown, you can select the option from the dropdown.
If the custom property is of type text, you can enter the text value.
If the custom property is of type date, you can select the date value from the calendar.17. Attach Message To Latest Ticket Action 🎫📎
The Attach Message To Latest Ticket action allows you to attach a message to the latest ticket based on ticket statuses. Only applicable if message is present.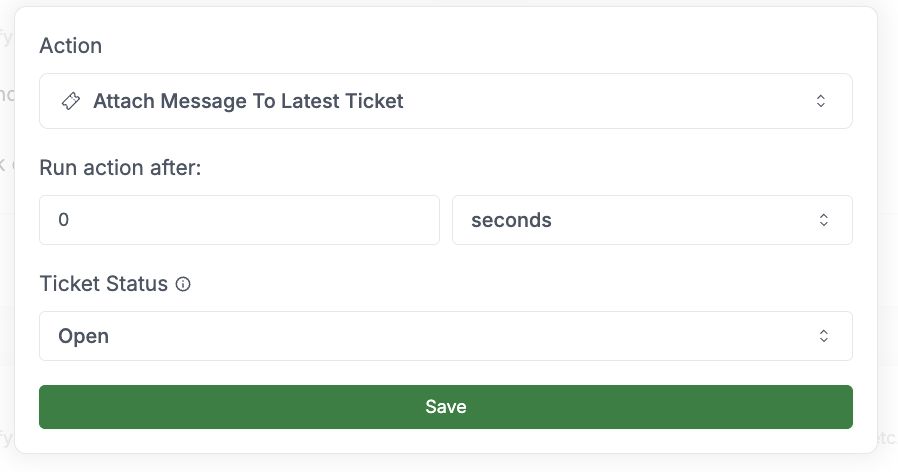
The delay before executing the action. You can specify the delay in seconds,
minutes, hours, or days.
Select the ticket status of ticket to attach the message to. Options include:
- Open/In Progress: Attach to tickets that are either open or in progress
- Open: Attach only to open tickets
- In Progress: Attach only to in progress tickets
18. Close Chat Action 💬❌
The Close Chat action allows you to close a chat conversation.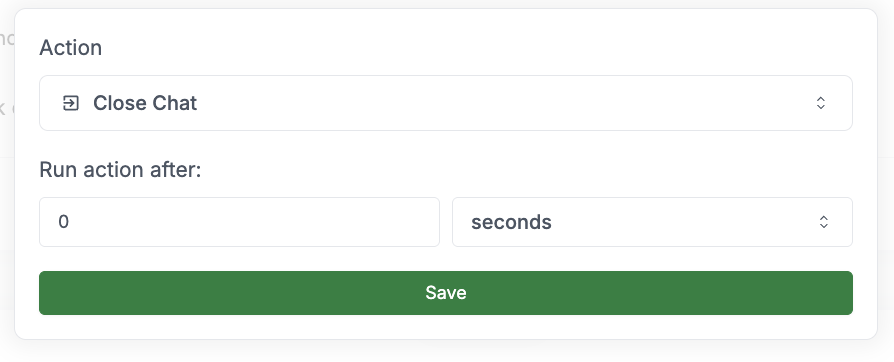
The delay before executing the action. You can specify the delay in seconds,
minutes, hours, or days.
19. Send Message To Chat Action 📩💬
The Send Message To Chat action allows you to send a message to a specified chat. This is different from the “Send Message” action as it allows you to explicitly select which chat to send the message to.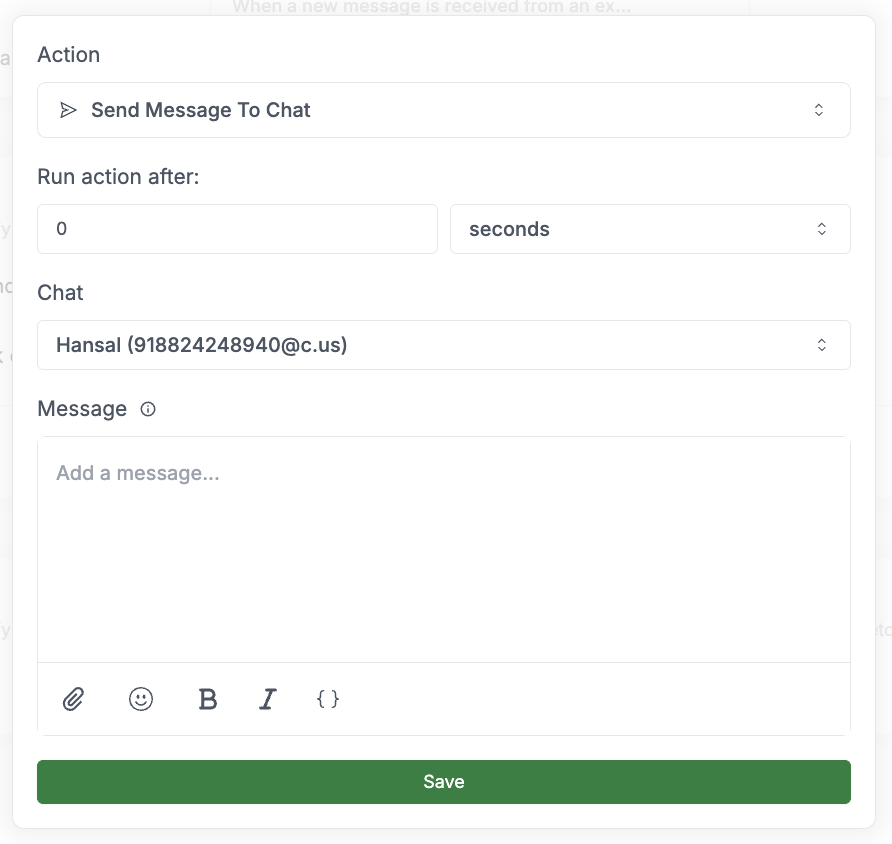
The delay before executing the action. You can specify the delay in seconds,
minutes, hours, or days.
The chat or group to send the message to.
The message content to be sent. You can add variables to personalize the message.Example:
Hello {{ chat.chat_name || '<fallback>' }}, your request has been received.Optional media file to attach to the message. You can upload an image, video, document, or other supported file type.
20. Send Slack Webhook Notification Action 🔔
The Send Slack Webhook Notification action allows you to send a slack webhook notification to a channel.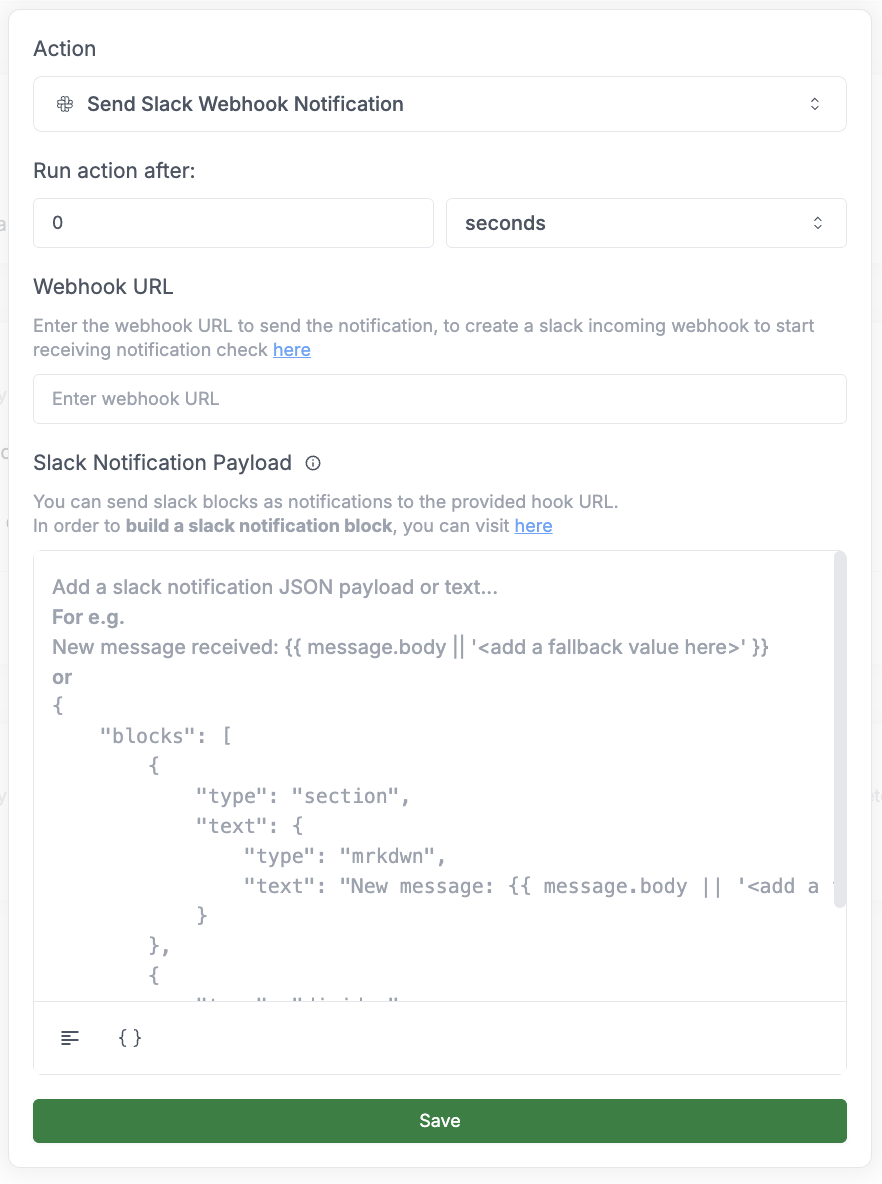
The delay before executing the action. You can specify the delay in seconds,
minutes, hours, or days.
The webhook URL to send the notification to. To create a slack incoming webhook to start receiving notifications, check here.
You can send slack blocks as notifications to the provided hook URL.In order to build a slack notification block, you can visit here.
21. Create Ticket On Freshdesk Action 🎫🔗
The Create Ticket On Freshdesk action allows you to create a ticket on Freshdesk. This action requires a Freshdesk integration to be set up. Action InputsThe delay before executing the action. You can specify the delay in seconds,
minutes, hours, or days.
22. Create Ticket On Hubspot Action 🎫🔗
The Create Ticket On Hubspot action allows you to create a ticket on Hubspot. This action requires a Hubspot integration to be set up.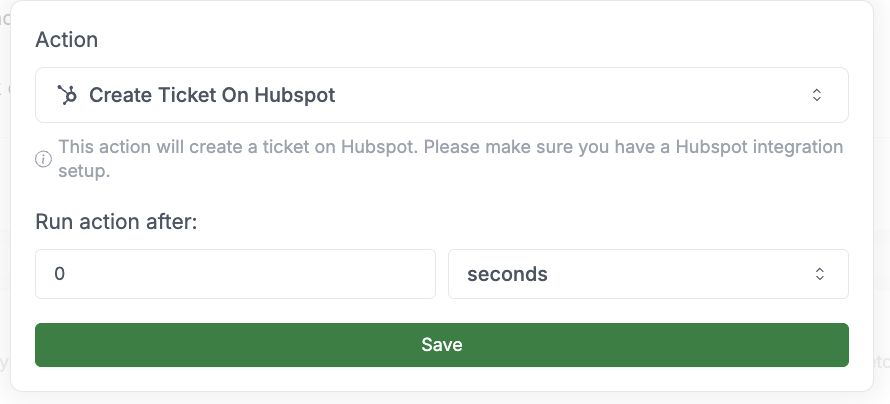
The delay before executing the action. You can specify the delay in seconds,
minutes, hours, or days.
23. Create Ticket On Zohodesk Action 🎫🔗
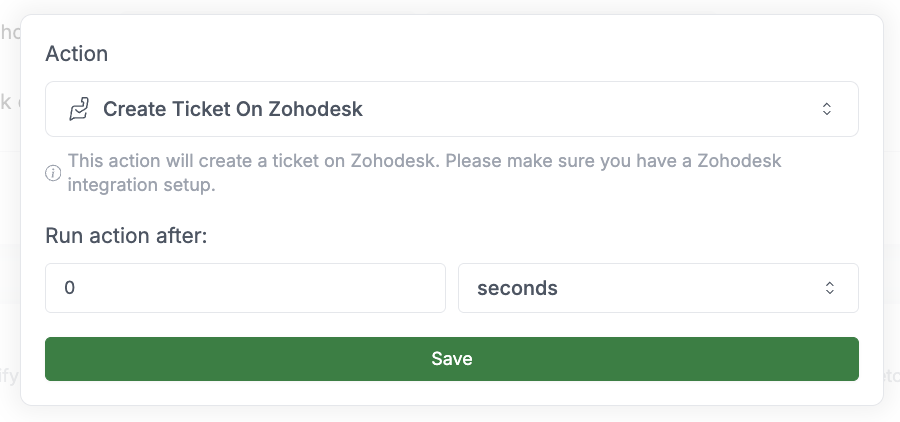
The delay before executing the action. You can specify the delay in seconds,
minutes, hours, or days.