> ## Documentation Index
> Fetch the complete documentation index at: https://docs.periskope.app/llms.txt
> Use this file to discover all available pages before exploring further.
# Custom Tools
> Connect your AI Agent to your own APIs so it can fetch real-time data and take actions in external systems
## Custom Tools
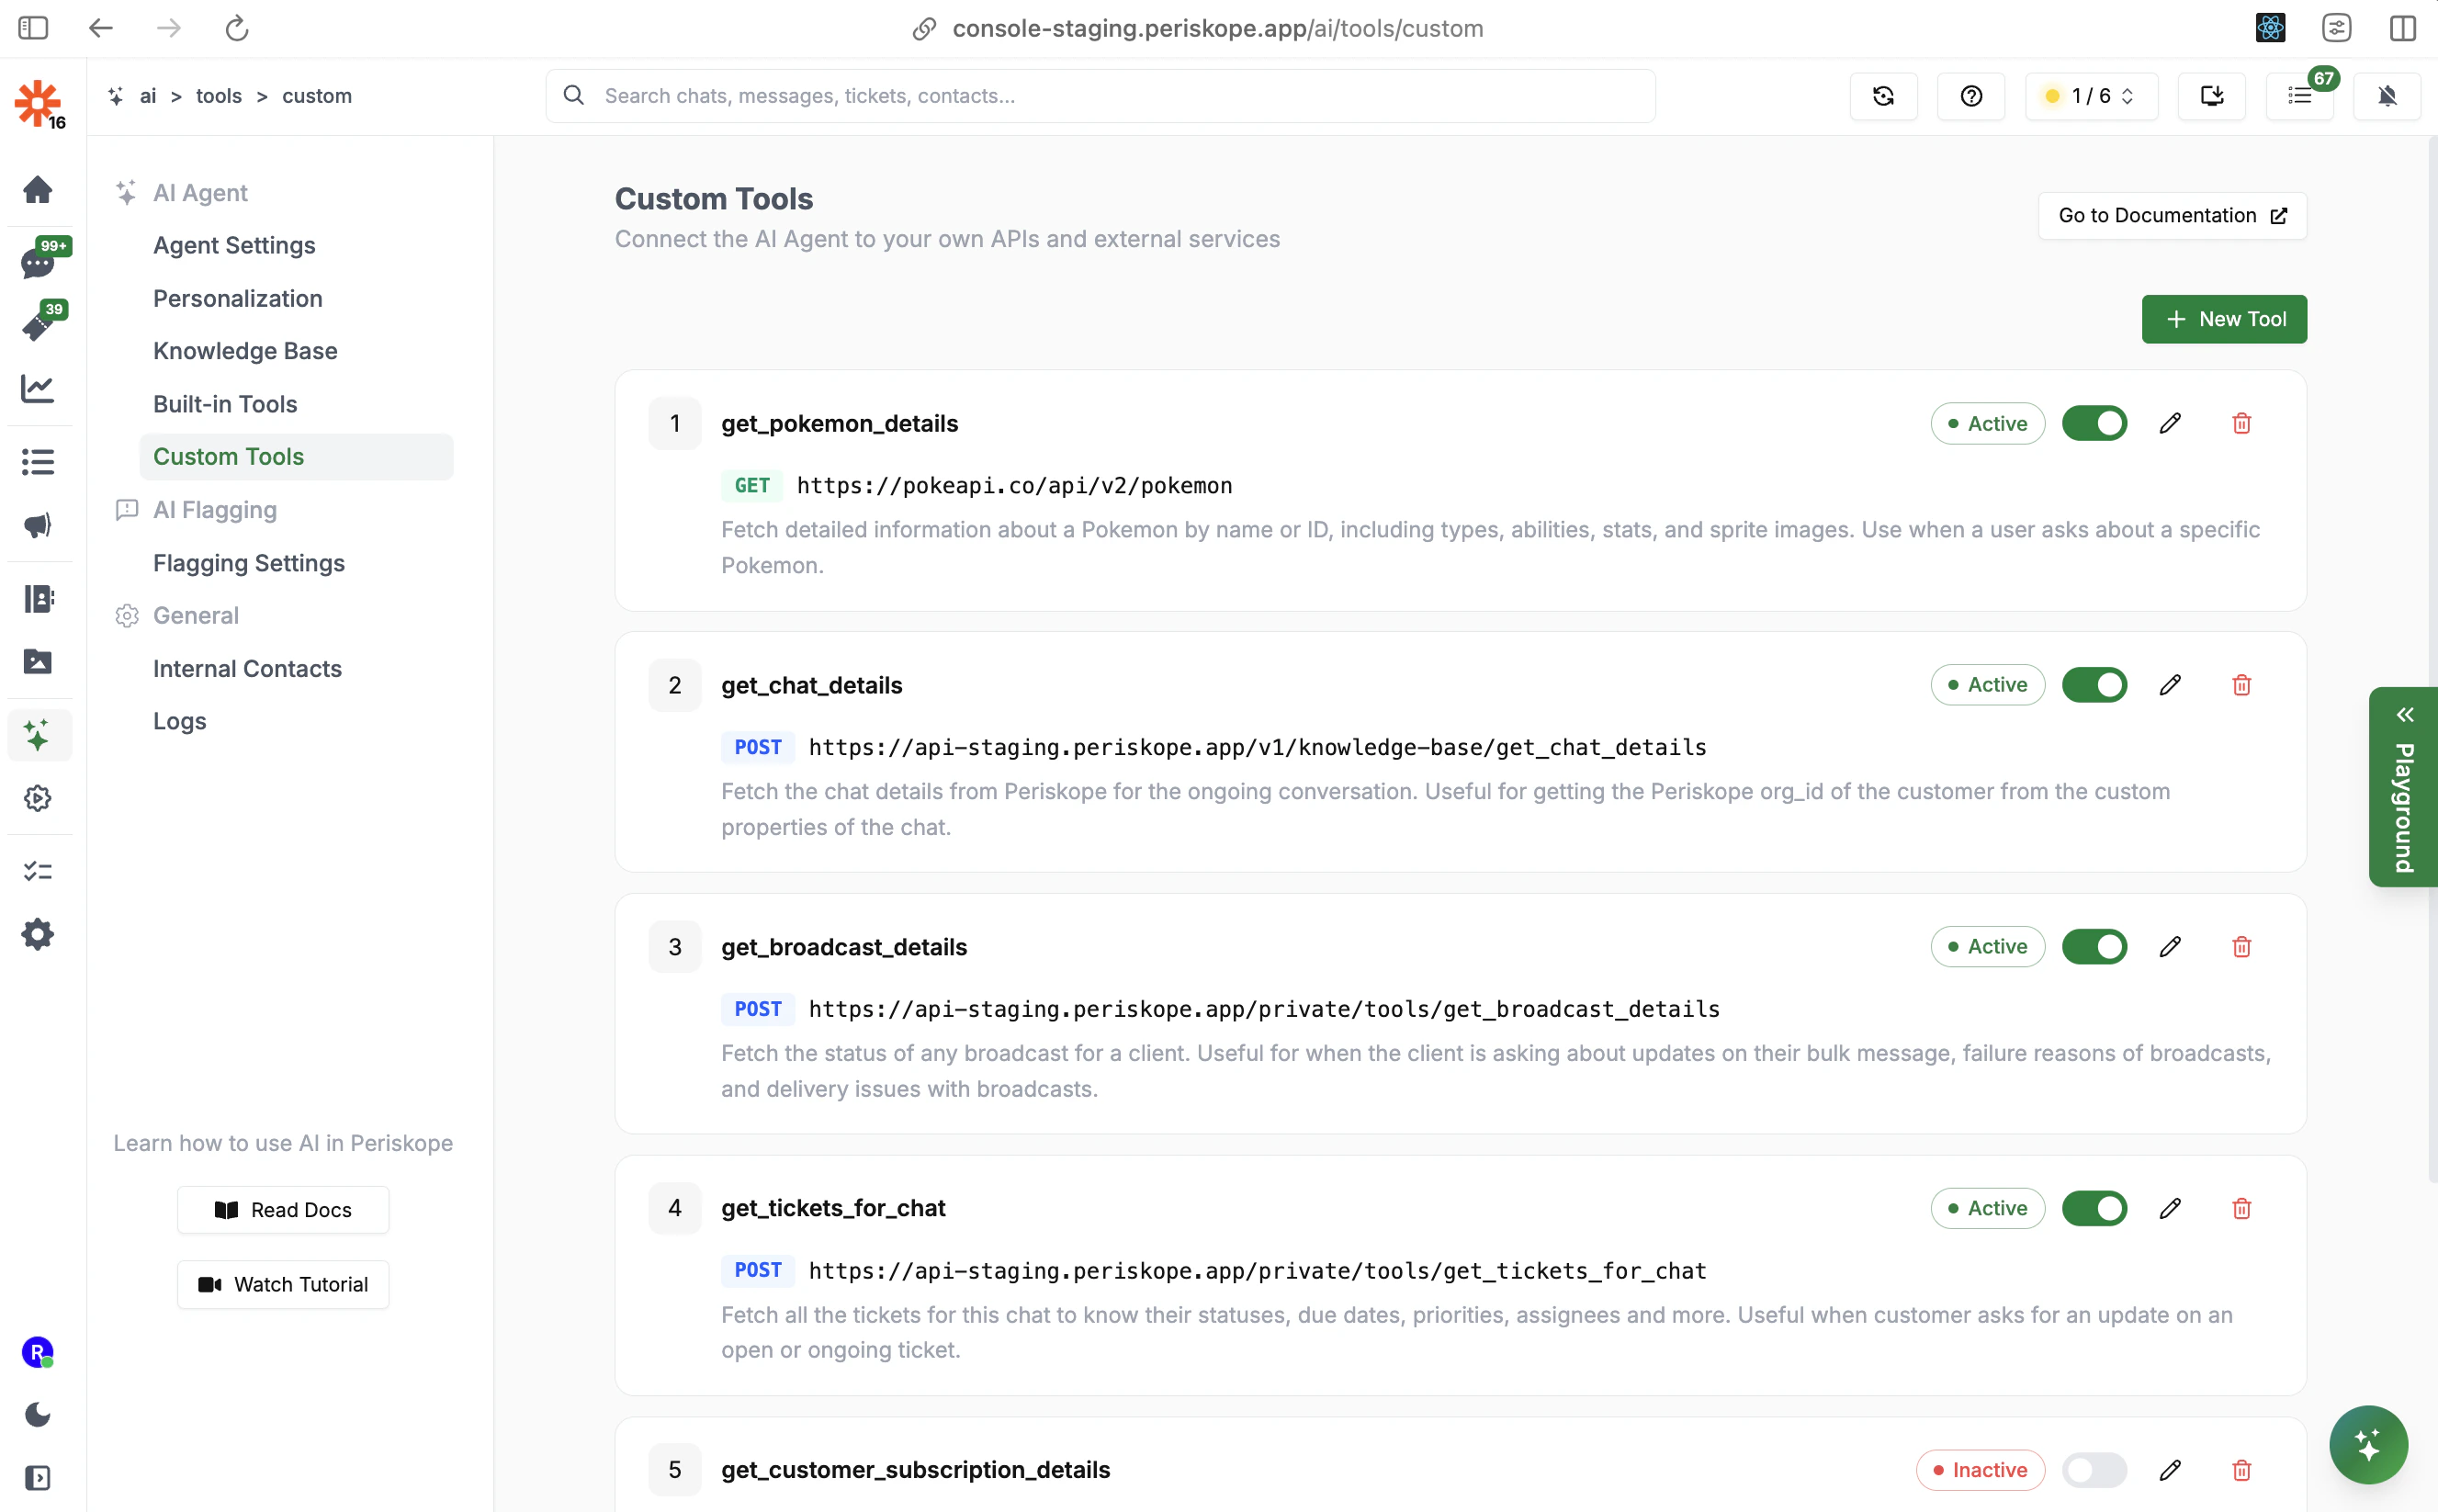
Custom Tools let you connect the AI Agent to any external HTTP API. When a customer asks something that requires live data — like checking an order status, fetching account details, or querying your internal systems — the AI can call your API and use the response to answer accurately.
Access Custom Tools through **AI** > **Custom Tools**.
The AI decides which tool to call based on the **tool name** and **description** you provide. Each tool can be toggled active or inactive individually.\\
***
## Creating a Custom Tool
Click **+ New Tool** to open the tool editor. A custom tool has four sections:
1. Basic Information
2. Authentication
3. Request Headers
4. Parameters
5. Response Schema (optional)
### 1. Basic Information
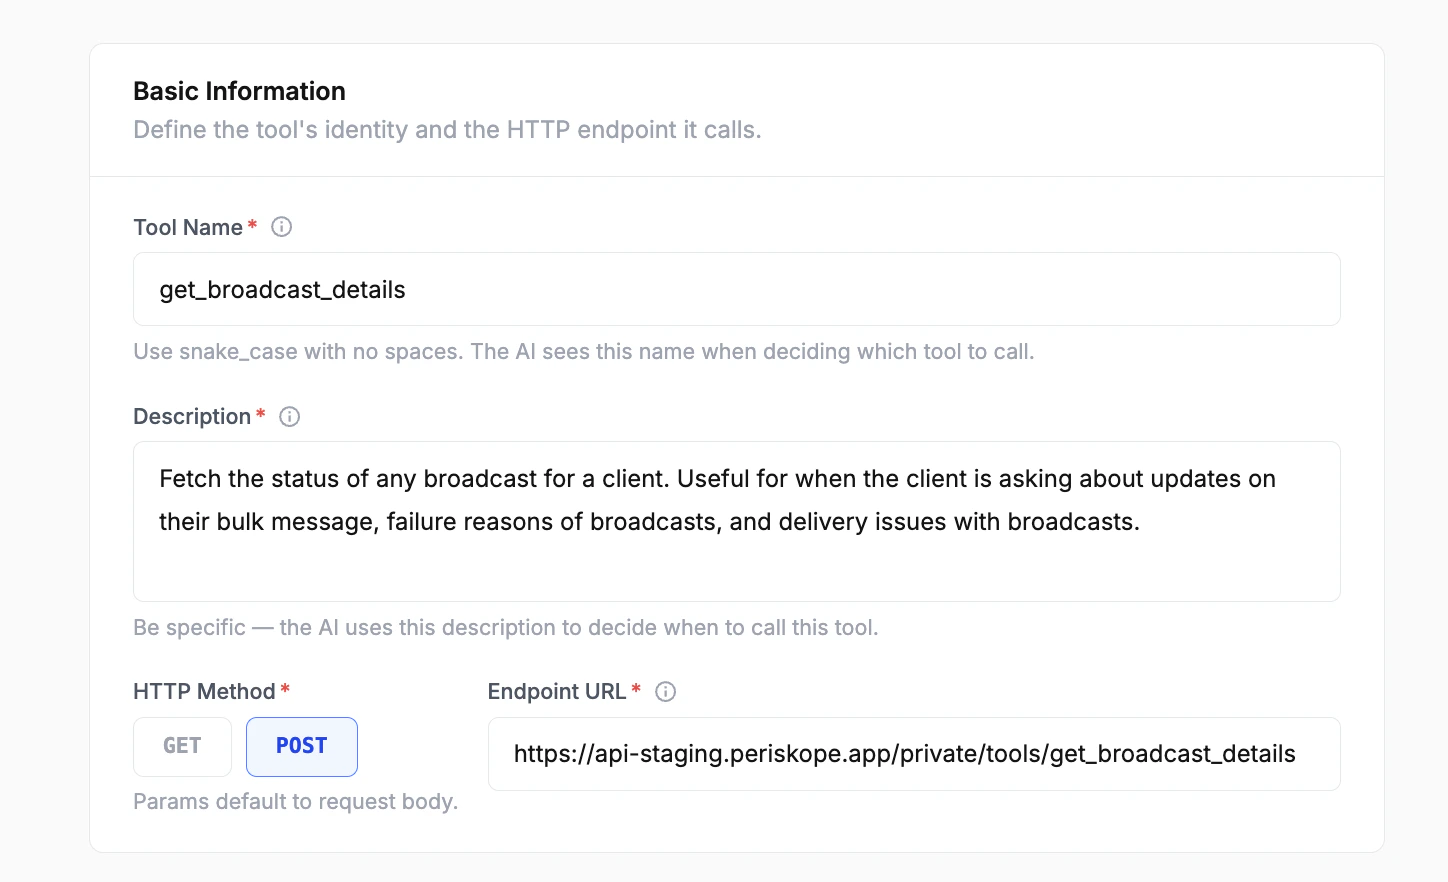
**Tool Name** (required)
Use `snake_case` with no spaces. The AI sees this name when deciding which tool to call.
```text theme={null}
get_order_status
fetch_account_details
check_subscription_plan
```
**Description** (required)
Describe exactly what this tool does and when the AI should use it. Be specific — the AI uses this description to decide whether to call this tool.
```text theme={null}
Fetch the current status of a customer order. Use this when the customer
asks about their order delivery, shipment tracking, or order confirmation.
```
**HTTP Method**
Select `GET` or `POST`.
* Use `GET` for fetching data (parameters go in the query string)
* Use `POST` for sending data (parameters go in the request body)
**Endpoint URL**
The full URL the AI will call. Must be a publicly accessible HTTPS endpoint.
***
### 2. Authentication
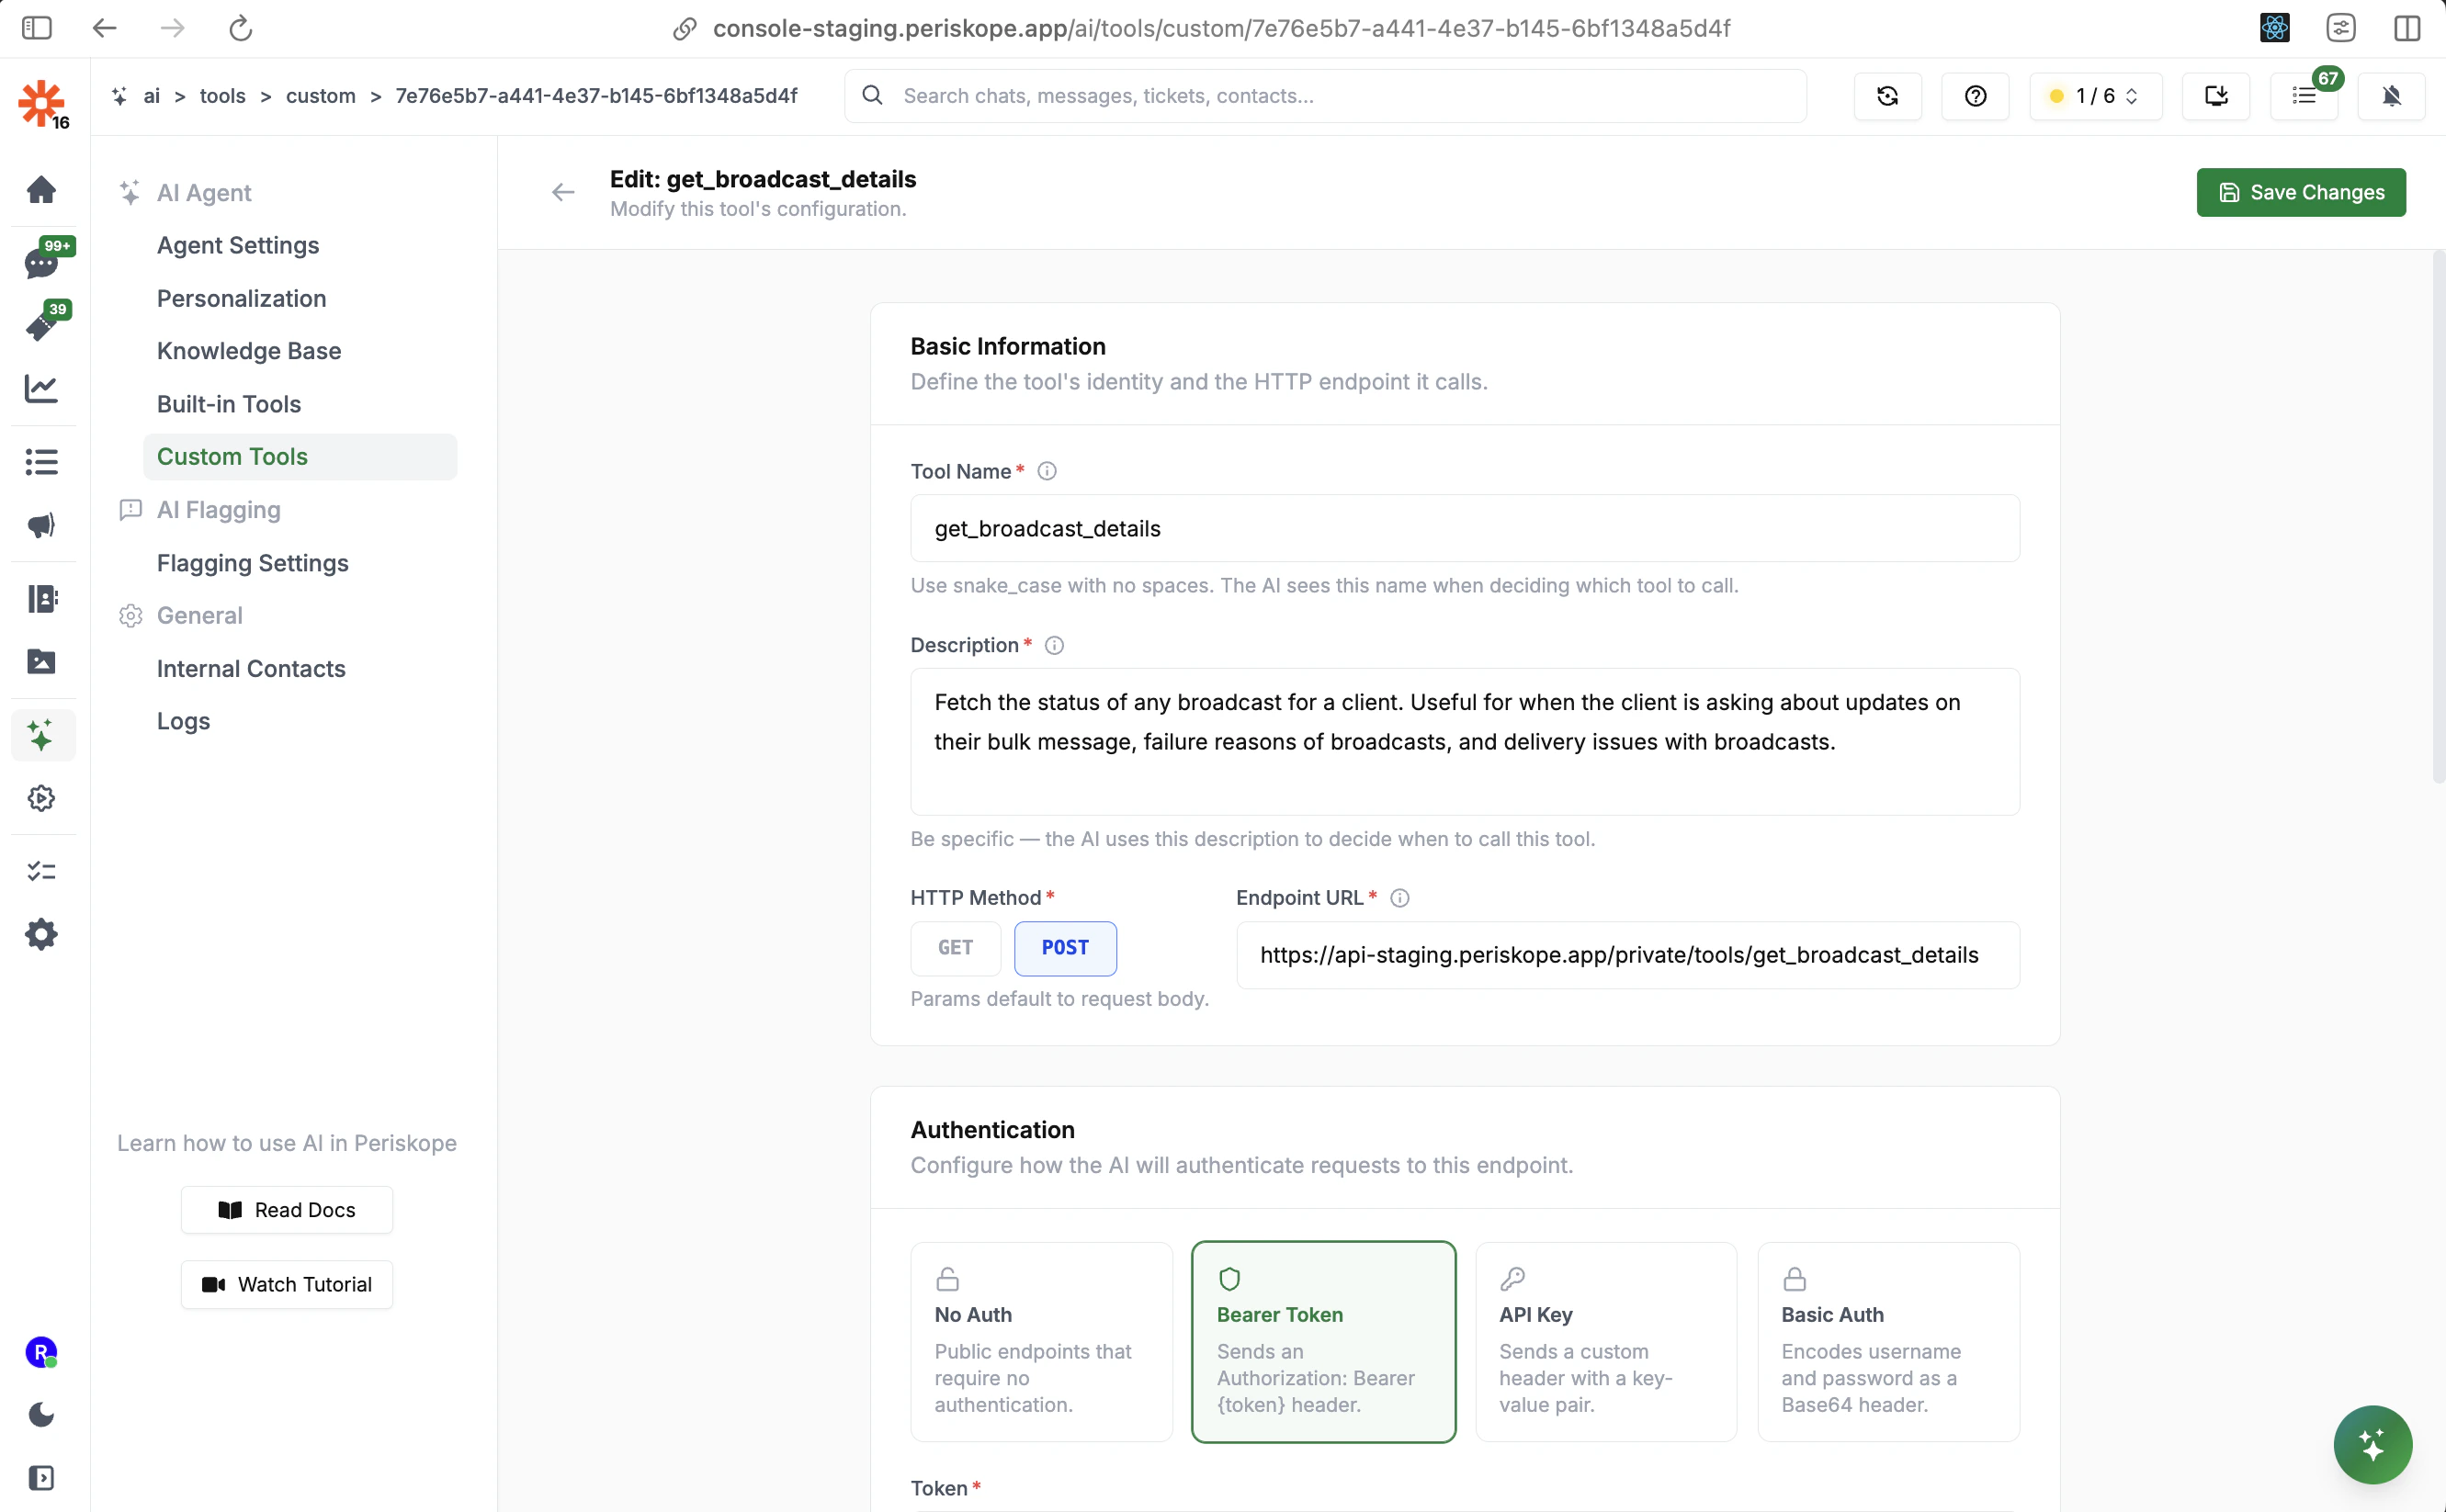
Choose how the AI authenticates with your endpoint:
| Auth Type | How It Works |
| ---------------- | ------------------------------------------------ |
| **No Auth** | Public endpoints that require no authentication |
| **Bearer Token** | Sends an `Authorization: Bearer ` header |
| **API Key** | Sends a custom header with a key-value pair |
| **Basic Auth** | Encodes username and password as a Base64 header |
For **Bearer Token**, enter your token and it will be sent as `Authorization: Bearer ` with every request.
***
### 3. Request Headers
Static headers sent with every call to this endpoint. Authentication headers are managed separately in the Authentication section above.
Use this for headers like `org_id`, `Content-Type`, or any other static values your API requires.
Click **+ Add Header** to add name-value pairs.
***
### 4. Parameters
Parameters define the inputs the AI will provide when calling this tool. Each parameter has:
| Field | Description |
| --------------- | ----------------------------------------------------------- |
| **Name** | The parameter name (use `snake_case`) |
| **Type** | Data type: `String`, `Number`, `Boolean`, etc. |
| **Location** | Where the parameter is sent: `Body`, `Query`, or `Path` |
| **Required** | Whether the AI must have this value before calling the tool |
| **Description** | Tell the AI what this parameter is and how to get it |
**Available Contexts**
At the bottom of the parameters section, you'll see **Available contexts**: `+ chat_id`, `+ org_phone`, `+ chat_name`. Click these to automatically inject conversation context as parameter values — no need for the AI to ask the customer.
**Parameter Description Tips**
The description tells the AI where to get the value from. Be explicit:
```text theme={null}
the org_id of the customer. AI needs to ask for the org_id or use the
get_chat_details tool to find it.
```
```text theme={null}
The customer's order number. Ask the customer for this if not already
provided in the conversation.
```
***
### 5. Response Schema (Optional)
Optionally describe the shape of your API's response using JSON Schema. This helps the AI accurately interpret the response and extract the right information.
Enable the toggle and provide your schema:
```json theme={null}
{
"type": "object",
"properties": {
"order_status": {
"type": "string",
"description": "Current status of the order: pending, shipped, delivered, or cancelled"
},
"estimated_delivery": {
"type": "string",
"description": "Estimated delivery date in ISO 8601 format"
},
"tracking_url": {
"type": "string",
"description": "URL for the customer to track their shipment"
}
}
}
```
Click **Insert example** to auto-generate a schema structure you can edit.
Adding a response schema significantly improves how accurately the AI interprets API responses, especially for complex or nested JSON structures. Always add descriptions to each property so the AI understands what the field means.
***
## Example: Full Custom Tool Setup
Here's a complete example of a tool that fetches broadcast status for a customer:
**Basic Information**
```text theme={null}
Name: get_broadcast_details
Description: Fetch the status of any broadcast for a client. Useful when the
client is asking about updates on their bulk message, failure reasons of
broadcasts, and delivery issues with broadcasts.
HTTP Method: POST
Endpoint: https://api.yourcompany.com/tools/get_broadcast_details
```
**Authentication**: Bearer Token
**Parameters**:
* `customer_org_id` — String, Body, Required — "The org\_id of the customer. AI needs to ask for the org\_id or use get\_chat\_details tool to find it"
* `customer_broadcast_id` — String, Body, Required — "The broadcast\_id. AI needs to ask for the broadcast\_id in order to fetch its details"
***
## Managing Tools
Back on the Custom Tools list, you can:
* **Toggle active/inactive**: Enable or disable a tool without deleting it. Inactive tools are not called by the AI.
* **Edit**: Click the pencil icon to modify a tool's configuration
* **Delete**: Click the trash icon to permanently remove a tool
The AI only calls tools that are marked as **Active**. Use the inactive state when testing new tools or temporarily disabling one without losing its configuration.
## How the AI Uses Custom Tools
The AI decides when to call a custom tool based on the conversation context and the tool's description. When it determines a tool is relevant:
1. It gathers the required parameters — either from the conversation context, by asking the customer, or from other tools
2. It makes the API call
3. It uses the response to formulate an accurate answer
You can see all tool calls made in a session in the [Logs](/ai/agent/logs) view under **Tool Calls**.
## Next Steps
* [**Built-in Tools**](/ai/agent/built-in-tools) - Configure native AI actions like creating tickets and private notes
* [**Knowledge Base**](/ai/agent/training) - Train the AI with FAQs and documents
* [**Personalization**](/ai/agent/personalization) - Define the AI's role and how it uses tools
 The AI decides which tool to call based on the **tool name** and **description** you provide. Each tool can be toggled active or inactive individually.\\
***
## Creating a Custom Tool
Click **+ New Tool** to open the tool editor. A custom tool has four sections:
1. Basic Information
2. Authentication
3. Request Headers
4. Parameters
5. Response Schema (optional)
### 1. Basic Information
The AI decides which tool to call based on the **tool name** and **description** you provide. Each tool can be toggled active or inactive individually.\\
***
## Creating a Custom Tool
Click **+ New Tool** to open the tool editor. A custom tool has four sections:
1. Basic Information
2. Authentication
3. Request Headers
4. Parameters
5. Response Schema (optional)
### 1. Basic Information
 **Tool Name** (required)
Use `snake_case` with no spaces. The AI sees this name when deciding which tool to call.
```text theme={null}
get_order_status
fetch_account_details
check_subscription_plan
```
**Description** (required)
Describe exactly what this tool does and when the AI should use it. Be specific — the AI uses this description to decide whether to call this tool.
```text theme={null}
Fetch the current status of a customer order. Use this when the customer
asks about their order delivery, shipment tracking, or order confirmation.
```
**HTTP Method**
Select `GET` or `POST`.
* Use `GET` for fetching data (parameters go in the query string)
* Use `POST` for sending data (parameters go in the request body)
**Endpoint URL**
The full URL the AI will call. Must be a publicly accessible HTTPS endpoint.
***
### 2. Authentication
**Tool Name** (required)
Use `snake_case` with no spaces. The AI sees this name when deciding which tool to call.
```text theme={null}
get_order_status
fetch_account_details
check_subscription_plan
```
**Description** (required)
Describe exactly what this tool does and when the AI should use it. Be specific — the AI uses this description to decide whether to call this tool.
```text theme={null}
Fetch the current status of a customer order. Use this when the customer
asks about their order delivery, shipment tracking, or order confirmation.
```
**HTTP Method**
Select `GET` or `POST`.
* Use `GET` for fetching data (parameters go in the query string)
* Use `POST` for sending data (parameters go in the request body)
**Endpoint URL**
The full URL the AI will call. Must be a publicly accessible HTTPS endpoint.
***
### 2. Authentication
 Choose how the AI authenticates with your endpoint:
| Auth Type | How It Works |
| ---------------- | ------------------------------------------------ |
| **No Auth** | Public endpoints that require no authentication |
| **Bearer Token** | Sends an `Authorization: Bearer
Choose how the AI authenticates with your endpoint:
| Auth Type | How It Works |
| ---------------- | ------------------------------------------------ |
| **No Auth** | Public endpoints that require no authentication |
| **Bearer Token** | Sends an `Authorization: Bearer 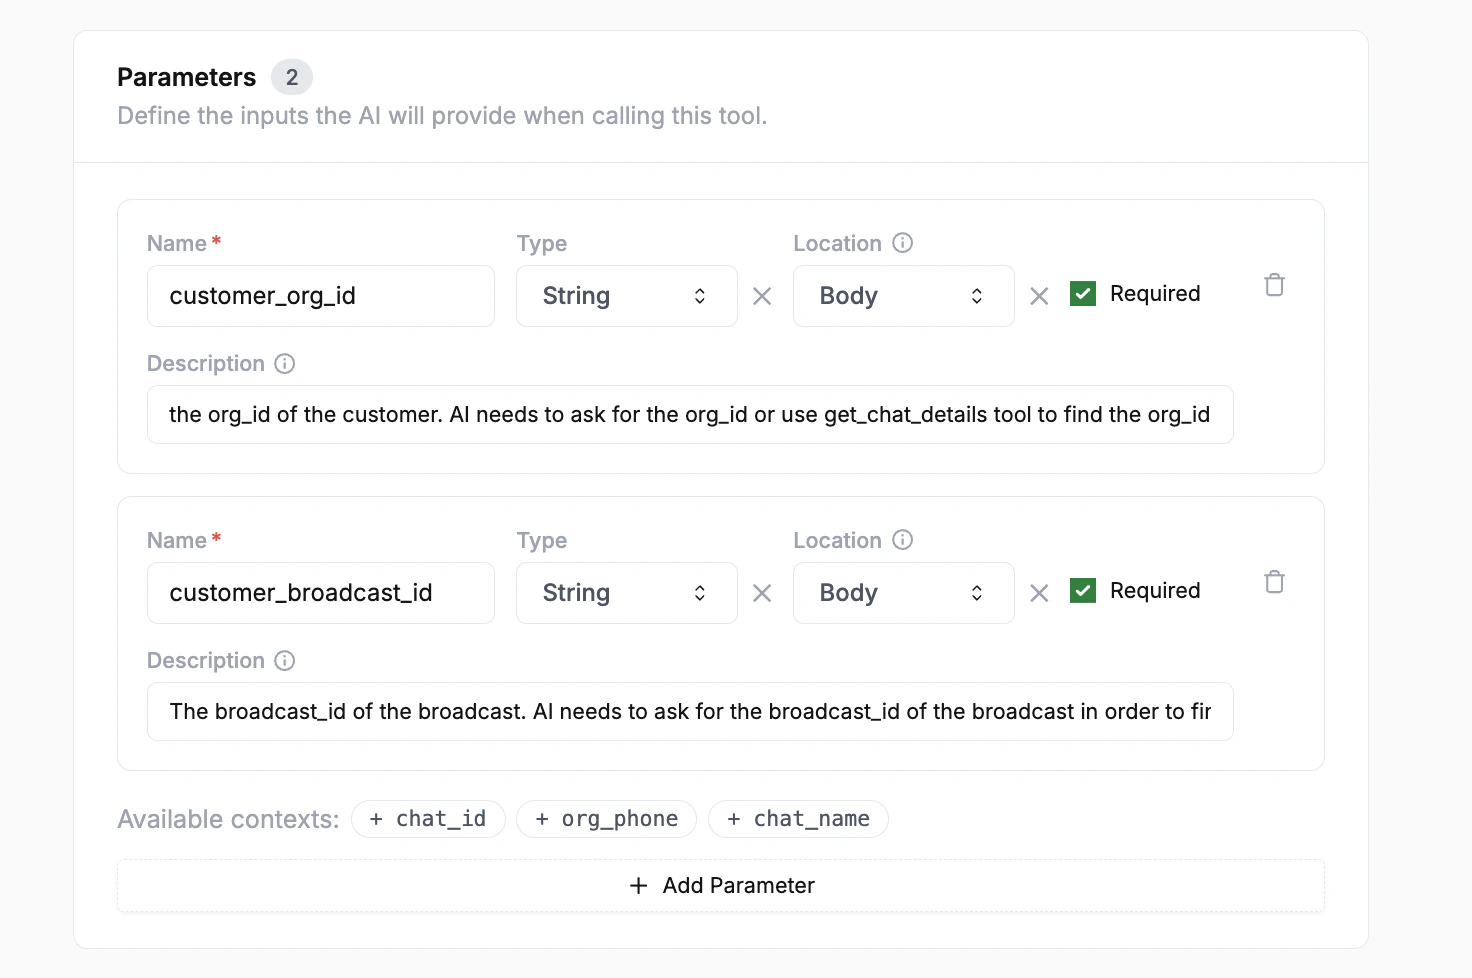 Parameters define the inputs the AI will provide when calling this tool. Each parameter has:
| Field | Description |
| --------------- | ----------------------------------------------------------- |
| **Name** | The parameter name (use `snake_case`) |
| **Type** | Data type: `String`, `Number`, `Boolean`, etc. |
| **Location** | Where the parameter is sent: `Body`, `Query`, or `Path` |
| **Required** | Whether the AI must have this value before calling the tool |
| **Description** | Tell the AI what this parameter is and how to get it |
**Available Contexts**
At the bottom of the parameters section, you'll see **Available contexts**: `+ chat_id`, `+ org_phone`, `+ chat_name`. Click these to automatically inject conversation context as parameter values — no need for the AI to ask the customer.
**Parameter Description Tips**
The description tells the AI where to get the value from. Be explicit:
```text theme={null}
the org_id of the customer. AI needs to ask for the org_id or use the
get_chat_details tool to find it.
```
```text theme={null}
The customer's order number. Ask the customer for this if not already
provided in the conversation.
```
***
### 5. Response Schema (Optional)
Parameters define the inputs the AI will provide when calling this tool. Each parameter has:
| Field | Description |
| --------------- | ----------------------------------------------------------- |
| **Name** | The parameter name (use `snake_case`) |
| **Type** | Data type: `String`, `Number`, `Boolean`, etc. |
| **Location** | Where the parameter is sent: `Body`, `Query`, or `Path` |
| **Required** | Whether the AI must have this value before calling the tool |
| **Description** | Tell the AI what this parameter is and how to get it |
**Available Contexts**
At the bottom of the parameters section, you'll see **Available contexts**: `+ chat_id`, `+ org_phone`, `+ chat_name`. Click these to automatically inject conversation context as parameter values — no need for the AI to ask the customer.
**Parameter Description Tips**
The description tells the AI where to get the value from. Be explicit:
```text theme={null}
the org_id of the customer. AI needs to ask for the org_id or use the
get_chat_details tool to find it.
```
```text theme={null}
The customer's order number. Ask the customer for this if not already
provided in the conversation.
```
***
### 5. Response Schema (Optional)
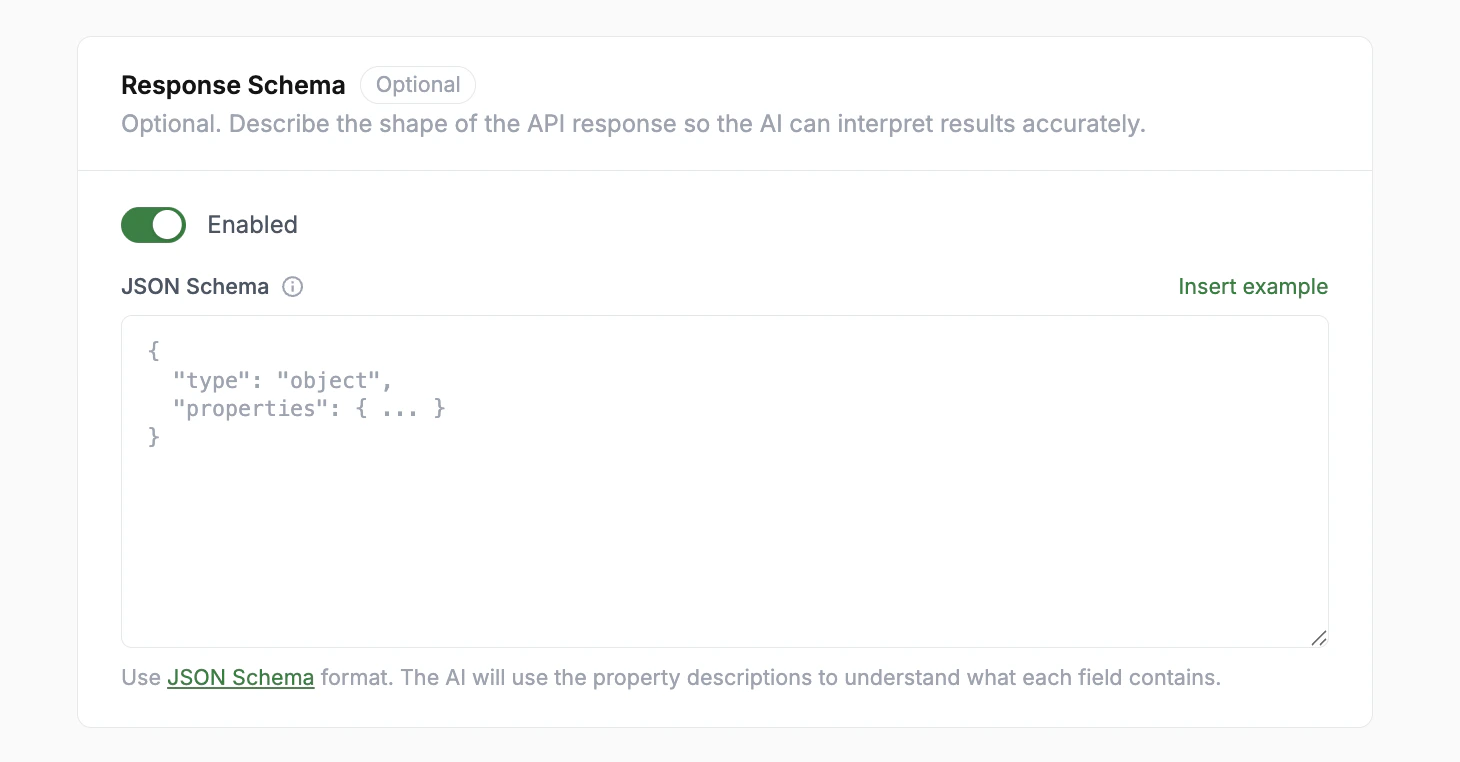 Optionally describe the shape of your API's response using JSON Schema. This helps the AI accurately interpret the response and extract the right information.
Enable the toggle and provide your schema:
```json theme={null}
{
"type": "object",
"properties": {
"order_status": {
"type": "string",
"description": "Current status of the order: pending, shipped, delivered, or cancelled"
},
"estimated_delivery": {
"type": "string",
"description": "Estimated delivery date in ISO 8601 format"
},
"tracking_url": {
"type": "string",
"description": "URL for the customer to track their shipment"
}
}
}
```
Click **Insert example** to auto-generate a schema structure you can edit.
Optionally describe the shape of your API's response using JSON Schema. This helps the AI accurately interpret the response and extract the right information.
Enable the toggle and provide your schema:
```json theme={null}
{
"type": "object",
"properties": {
"order_status": {
"type": "string",
"description": "Current status of the order: pending, shipped, delivered, or cancelled"
},
"estimated_delivery": {
"type": "string",
"description": "Estimated delivery date in ISO 8601 format"
},
"tracking_url": {
"type": "string",
"description": "URL for the customer to track their shipment"
}
}
}
```
Click **Insert example** to auto-generate a schema structure you can edit.